The last installment of Romi's 2010 Pins and Lace club has been released into the wild, the lovely October design Sevillano (Rav link).
I love this design, I think it's gorgeous, I adore the flowing design motifs on the outside of the shawl, and the only thing holding me back from casting on right away was trying to figure out the right yarn. I went shopping last weekend and came up empty, and then when I was fretting about what to get (and the money I was probably going to spend), the SO asked, very reasonably, whether I didn't have anything in the stash I could use.
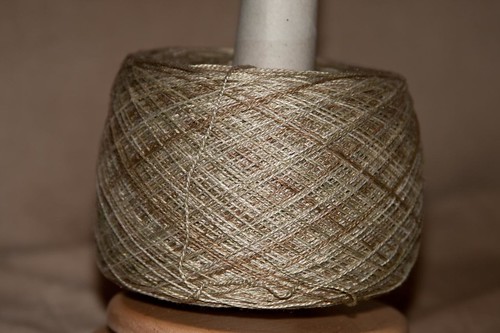
I was in the middle of impatiently telling him that OF COURSE I didn't have anything in the stash, when I stopped right in the middle of the sentence and shut my mouth, because I remembered this.

You may remember it from my inappropriate glee for having scored it at half price at the Knit Happens closing sale (let us have a moment of silence for a very worthy yarn store that has now passed on....aaand we're done). This is Shaefer Andrea 100% silk in colorway Barbara McClintock. Does the word 'perfect' come to mind or what?
So I did what any knitter would do.
Conscience pricked a little, so I finished Elektra before I actually cast on (more on that in the bonus post), but I didn't wait much longer than that.
Now, as a rule, I shy away from calling anything 'hard' because in my experience, people get intimidated when they hear something is 'hard' and quit before they even try. I have done dozens of supposedly hard things in my knitting career simply because I didn't know they were supposed to be hard. I think the worst thing anyone can do, especially a teacher (and although I am not a teacher, I find myself in that role fairly often in regards to knitting), is to tell someone else that something is hard.
And, frankly, it is very rare that I run something while knitting that is truly hard. The great thing about knitting is that it can be broken down into very tiny steps, and when you can do that something that seems to be hard is quickly downgraded to merely challenging. Such is the case with this pattern. It's challenging. This is not something you knit on the bus while chatting with your friends. It's something you knit at home, in good light, while awake and alert, so that you can break it down to the point where it becomes manageable. Taken one stitch at a time, it is very, very accomplishable.
With that said, I managed to screw it up several times. The good news is that this pattern is built from the point up, so that in the process of figuring out that this is not your average lace pattern, you only screw up a small number of stitches, so you can just rip it out and try again. Which is what I did. Twice.
Then I started giving the pattern its proper respect, got into the flow of things, and tooled along quite well. Then, as I was sitting on the couch being ignored by my boyfriend, who was deep in the throws of a Starcraft match, I realized that something didn't look right. I waited for his match to finish and made him pay attention to me for a minute while we put our heads together and figured out that I had, in fact, screwed up. To the great credit of his patience and knit-friendliness, he was the one who actually figured out what the problem was - or at least, where it was, which allowed me to figure out what it was.
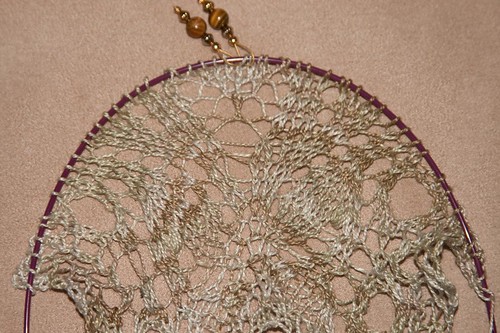
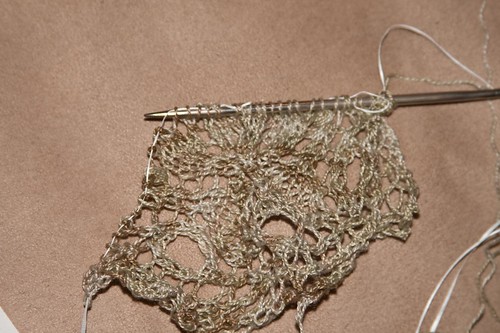
The stitch markers in that photo mark the center stitch, and if you follow it down you will see that it ends in a yarn over. All seems well until you look at the unholy mess of string beneath the yarn over, which is what first alerted me that there was a problem. If you look at the arc of yarnovers to the left of that center stitch, you may be able to see there's a stray yarnover that's out of line. These two mistakes do not appear to be on the same row, but they are. Because of this shawl's ingenious construction, even though it's knit from the point up, it looks like a shawl that was knit from the center back. Because of this same construction, the rows tend to form themselves into arcs as you work, as you can see from the way the cable curves. So if you draw an arc from that stray yarnover to the mess below the center stitch, they are in fact in the same row.
Now, I'm not afraid of a little laddering and lace surgery, but it was clear to me that this was going to be beyond my skill for that and I was going to have to rip out. And, naturally, in my arrogance (or laziness, you decide) I hadn't put in any lifelines - but I have a solution for this problem.
I put the shawl away for the evening and the next afternoon, rested, well-fed, and mentally sharp (or as close as I had a hope of getting), I assembled my tools.

Mint optional. It just happens to be what I had.
Then I took a deep breath and took the shawl off the needles.
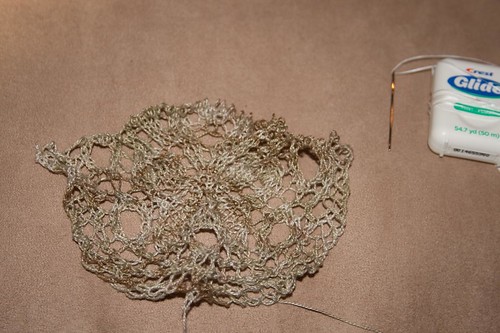
Scary. Then I carefully ripped back to what appeared to be the problem row, which, as it happened, was the row just above the row in which I purled my nupp stitches together. This made an easy reference point for when to stop.
Then I picked up my embroidery needle, threaded with dental floss, and took hold of the working yarn and pulled carefully, picking up each stitch on the embroidery needle as the working yarn slipped out of it. I couldn't take a picture of that part because my man was off pursuing his own hobby, Go, and was not around to assist me.
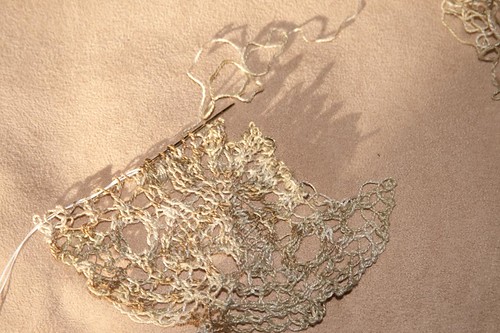
The sun was setting by now, and I was concentrating too hard to close the blinds, thus the dramatic lighting. Sorry about that. But it gives you the idea. I did find that because of the way the shawl tended to curve, it helped to occasionally pause and pull the needle up so that all the stitches were on the floss, allowing me to manipulate the angle of the needle a little more freely.
At last, I had all the stitches on the floss, or at least close to it. Sometimes when I do this the stitches drop a row despite my best efforts, and I end up with the row below it on my needle for a couple of stitches, but that is one reason I try to make the row I am picking up a purl row, because it makes those problems easier to fix. Sevillano does have some lace patterning even on wrong side rows, but it wasn't too bad and I was very careful, so I did good - I think I may have lost a yarnover or two but again, easily fixed.

Then I picked up my needles and followed the floss with the needle tip. If a stitch tried to dip, I pulled the floss taught and the stitches popped right back up where they belonged.
But Ninja, I hear you ask - why not just pick up the stitches with the needle in the first place.
Well, dear reader, that is a lesson I learned the hard way. The embroidery needle is so thin that it really doesn't put any stress on the stitches at all. I found that when I used the knitting needle to pick up the stitches, I inevitably jerked the loop of yarn out of the next stitch or two. Or five. The embroidery needle slides through neatly. I do recommend a slightly blunt needle so that you don't stab right through the stitch. The embroidery needle is shorter and more maneuverable than a knitting needle, and the dental floss doesn't pull or weigh down the project as you're working with it.
Once I had the needle completely through the project, I slid the whole thing to the cable and pulled the dental floss out (I find it's easier if the project is on the cable, so the floss has plenty of room to slide out).
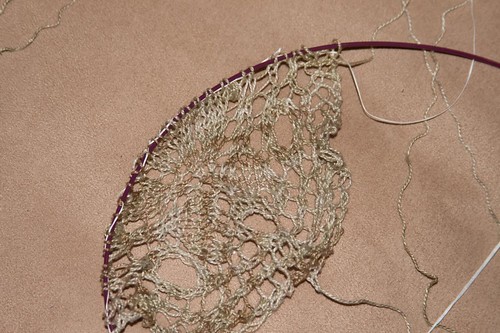
I was then able to knit back up to where I was. If you compare the picture below with the first picture up top, you should be able to see the difference very easily. Now if you follow the center stitch down, it ends in that yarnover, but the stitches beneath it are tight and happy, not all stringy and loose and wonky.
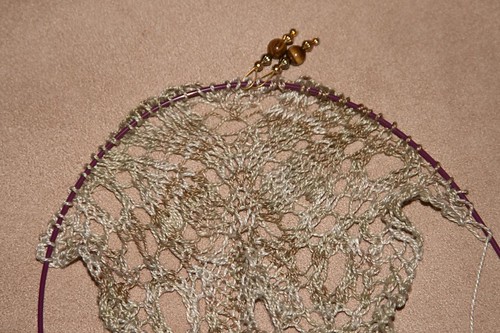
Just to add insult to injury, as it turned out, the mistake was a dropped M1 stitch. My loathing of the M1 increase is well known, and I will sub it out any time I can, but in this pattern I thought it was best to do the increases as written. Clearly this M1 chose to take vengeance for all the vitriol I have uttered against its kind, and leaped off the needles while I wasn't looking. I didn't find the mistake because I did an extra yarnover in the same row, so I still had the right number of stitches when I worked the following row. One of the things I find challenging about this pattern is that I have been trained by all my lace knitting that decreases are paired with yarn overs, and in this pattern, there are several decreases who either have no yarn over or whose matching yarn overs take place further down the row. It's so ingrained in me that I should yarn over after a knit two together or before an ssk, that I do it without thinking. This has caused me problems before on patterns where the yarn over is on a side of the decrease that I didn't expect (for example, if the instruction is to ssk and then yarn over instead of the other way around).
Well. Problem solved, and I am moving onward with this beautiful (yet challenging) pattern. And let me encourage anyone reading this not to let the difficulty put you off from trying the pattern. If beauty were easy the world would be full of supermodels.
Most of the individual stitch techniques used in this shawl, such as nupps and twists, have been demonstrated on youtube, but I couldn't find a demo video for the triple yarn over stitch, so I made one, with the help of a trusty accomplice.
That's it for today - bonus post to come later this week!
ETA: Mercy, you guys, did I ever forget to spell check before posting. I promise I am not a complete moron, I just compose in Wordpad which doesn't highlight misspelled words, and I forgot to hit the spell check before I published the posts. I apologize for the crimes committed against the English language in the original version of this post. If you're reading this since this edit, you will be forever doomed to wonder what horrible mistakes I made, and I'm totally okay with that.


No comments:
Post a Comment